 Sprout Affiliate
The MCP server
Sprout Affiliate runs an MCP server, so an AI assistant can work with your affiliate program in plain language. Ask Claude which affiliates drove the most sales since your last payout, what commission is waiting to be approved, or to approve the three applications that came in overnight, and it looks the answer up in your store instead of you opening the admin.
The server is at https://app.sproutaffiliate.com/mcp. It uses the Streamable HTTP transport. Claude and ChatGPT connect with a Connect button that you approve in your Shopify admin; other assistants use a key you create in the app.
Claude (web, desktop, and phone)
Claude connects with a Connect button. There is no key to copy.
- In Shopify, open Sprout Affiliate > Settings > Developer. In the MCP card, choose Claude and press Copy beside the server URL.
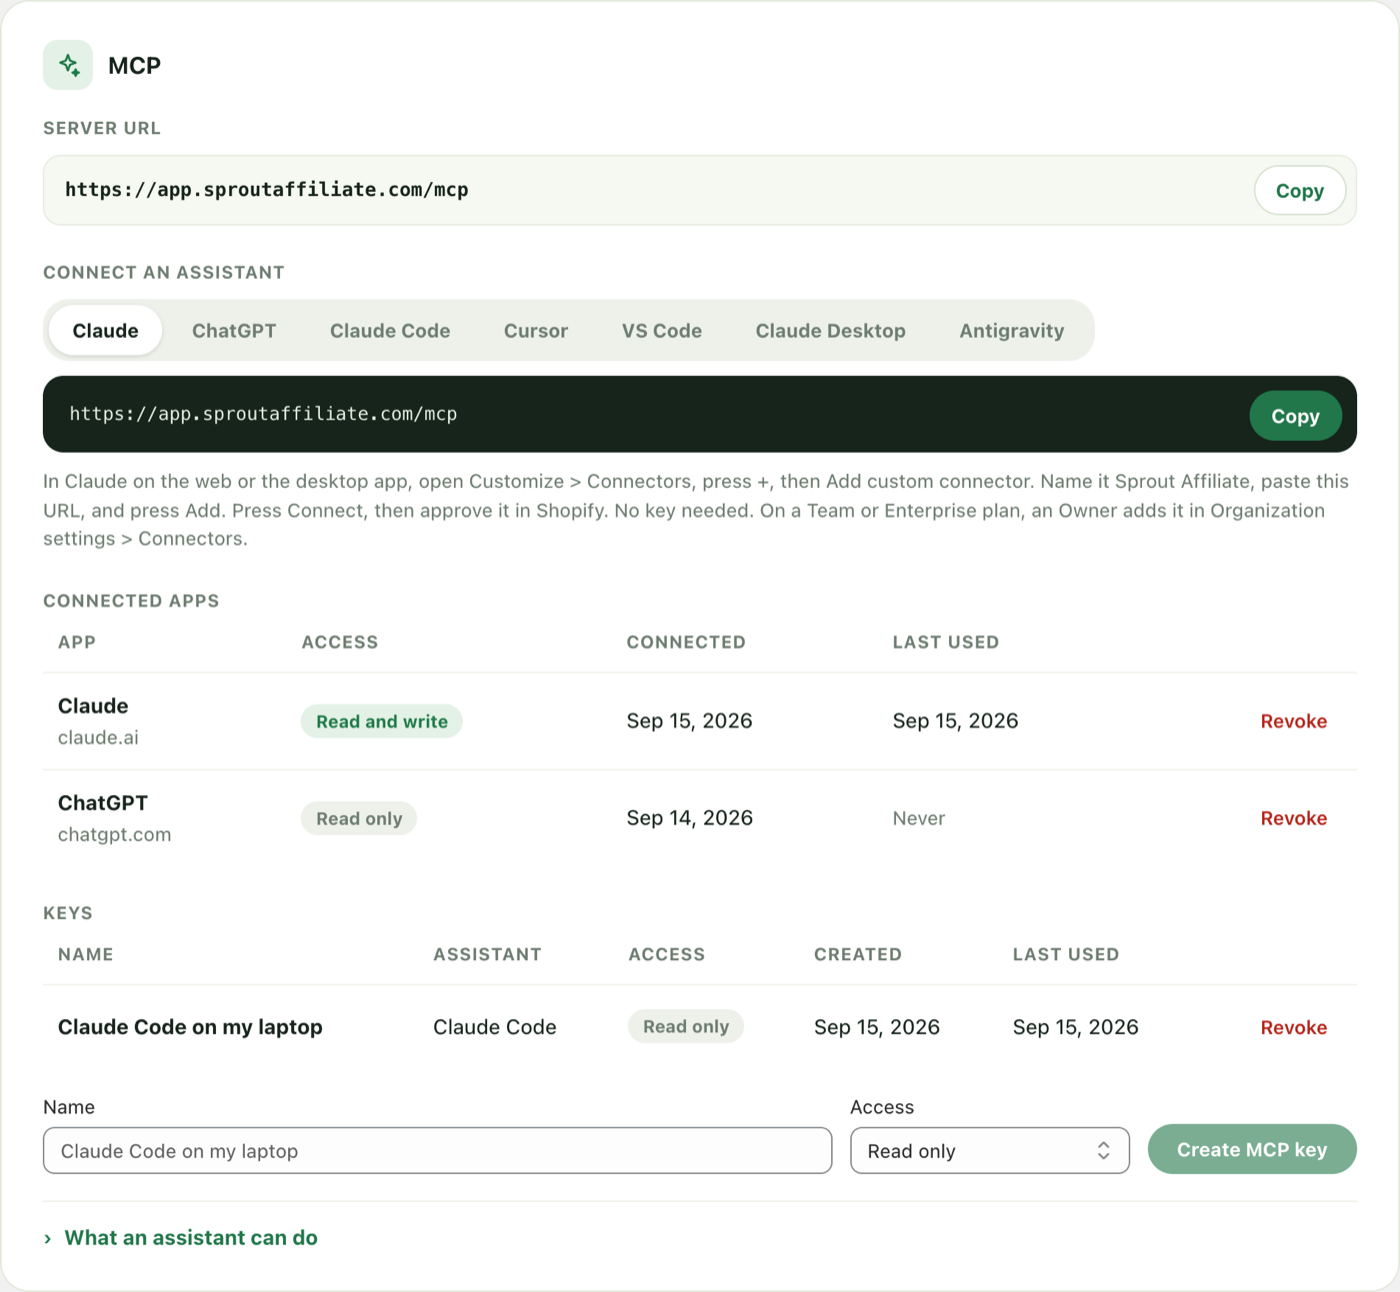
- In Claude on the web or the desktop app, open Customize > Connectors, press +, then Add custom connector.
- Name it Sprout Affiliate, paste the URL, and press Add. Leave the OAuth fields in Advanced settings empty.
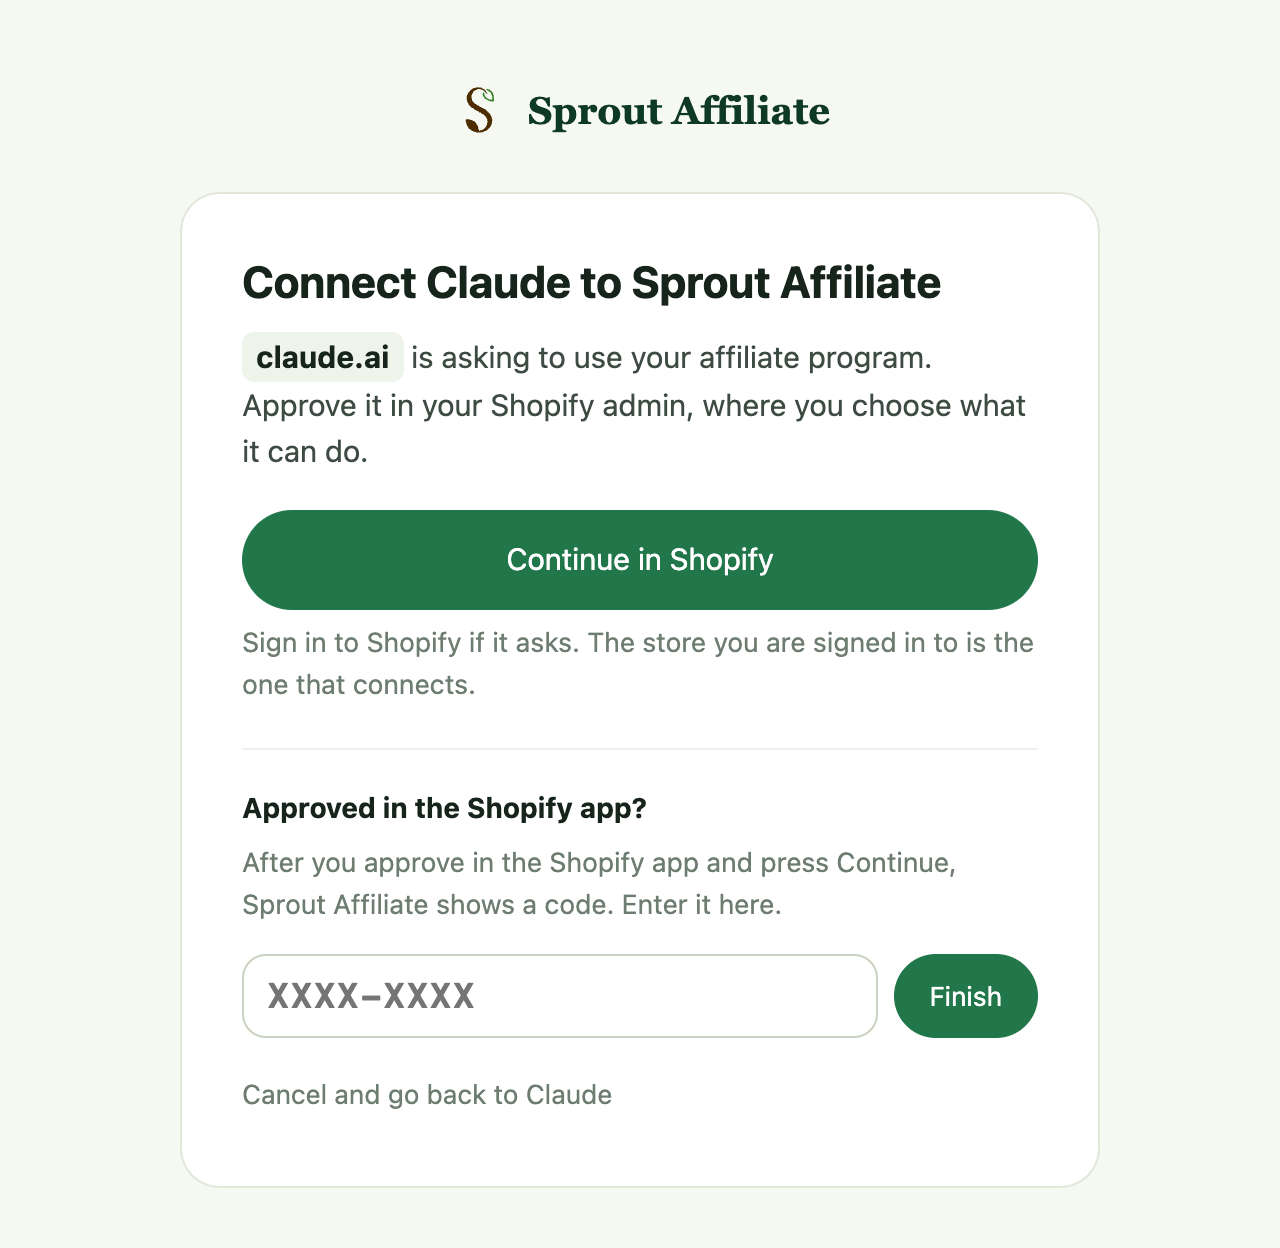
- Press Connect on the new connector. Claude opens a Sprout Affiliate page. Press Continue in Shopify.
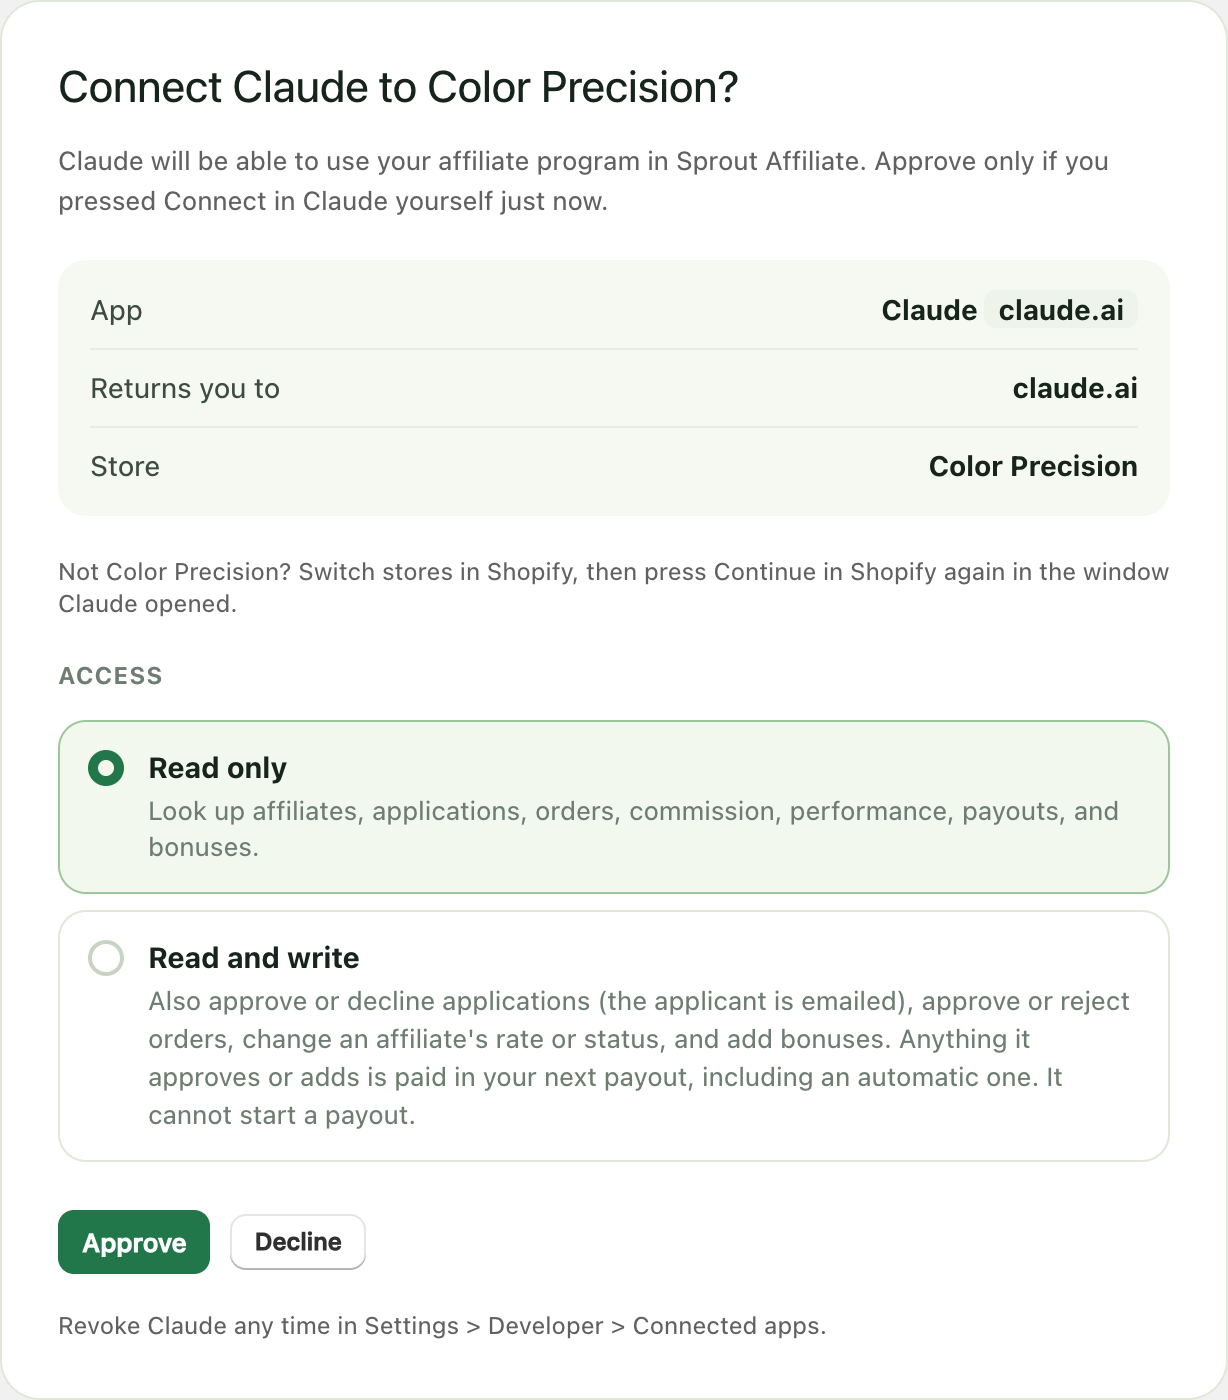
- In your Shopify admin, check the store name, choose Read only or Read and write, and press Approve.
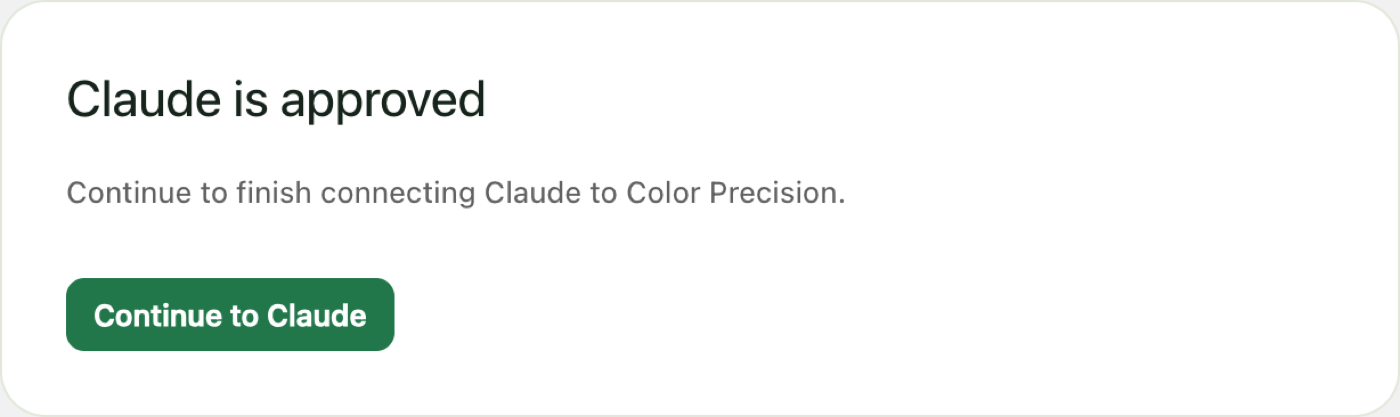
- Press Continue to Claude. You are back in Claude, connected, and Sprout Affiliate appears under Connectors.
On a Team or Enterprise plan, an Owner adds the connector in Organization settings > Connectors, and each member presses Connect on it in Customize > Connectors.
Approving in the Shopify app on your phone
If the approval opens in the Shopify app instead of the browser Claude opened, approve there and press Continue. Sprout Affiliate shows a code. Go back to the Sprout Affiliate page Claude opened, type the code under Approved in the Shopify app?, and press Finish.
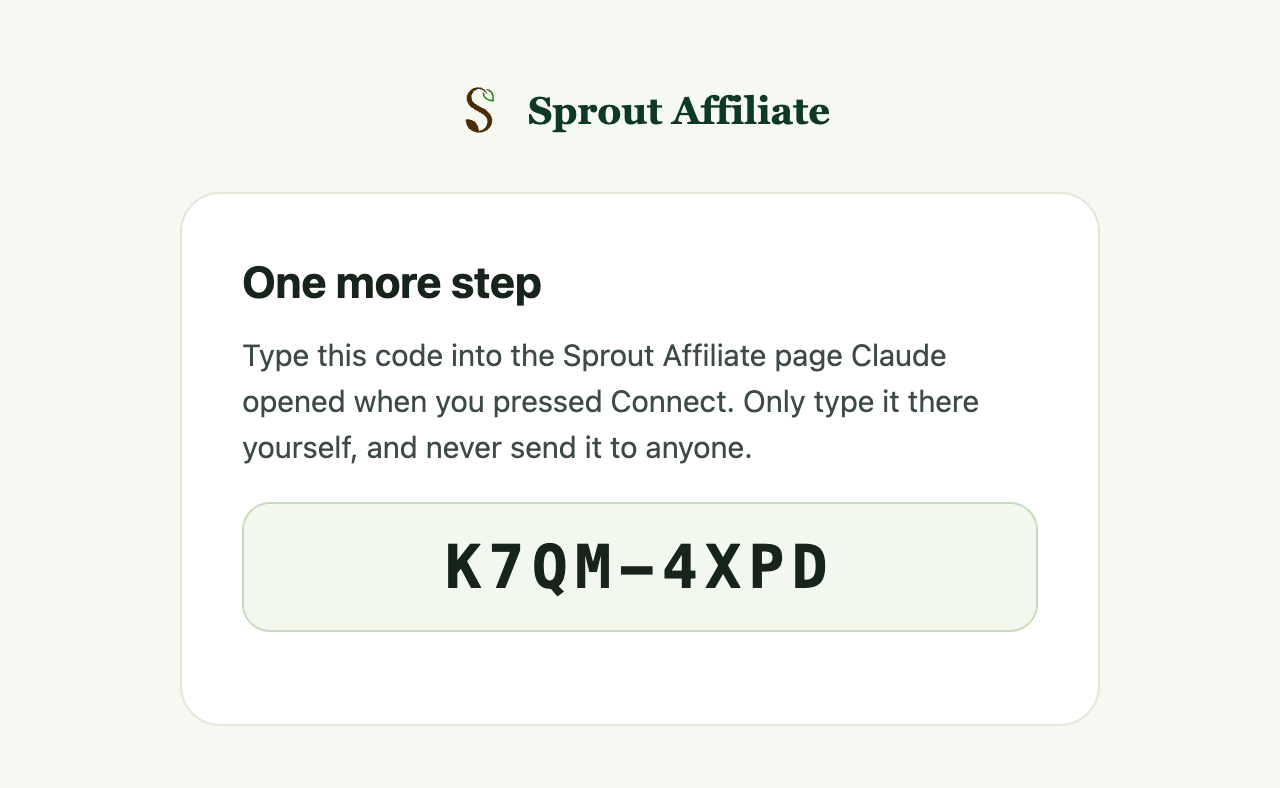
Only type the code yourself, into the page you opened from Claude or ChatGPT. Sprout Affiliate never asks you to send it to anyone.
ChatGPT
Developer mode is on chatgpt.com with a Plus, Pro, Business, Enterprise, or Edu plan.
- In Sprout Affiliate > Settings > Developer, choose ChatGPT and copy the server URL.
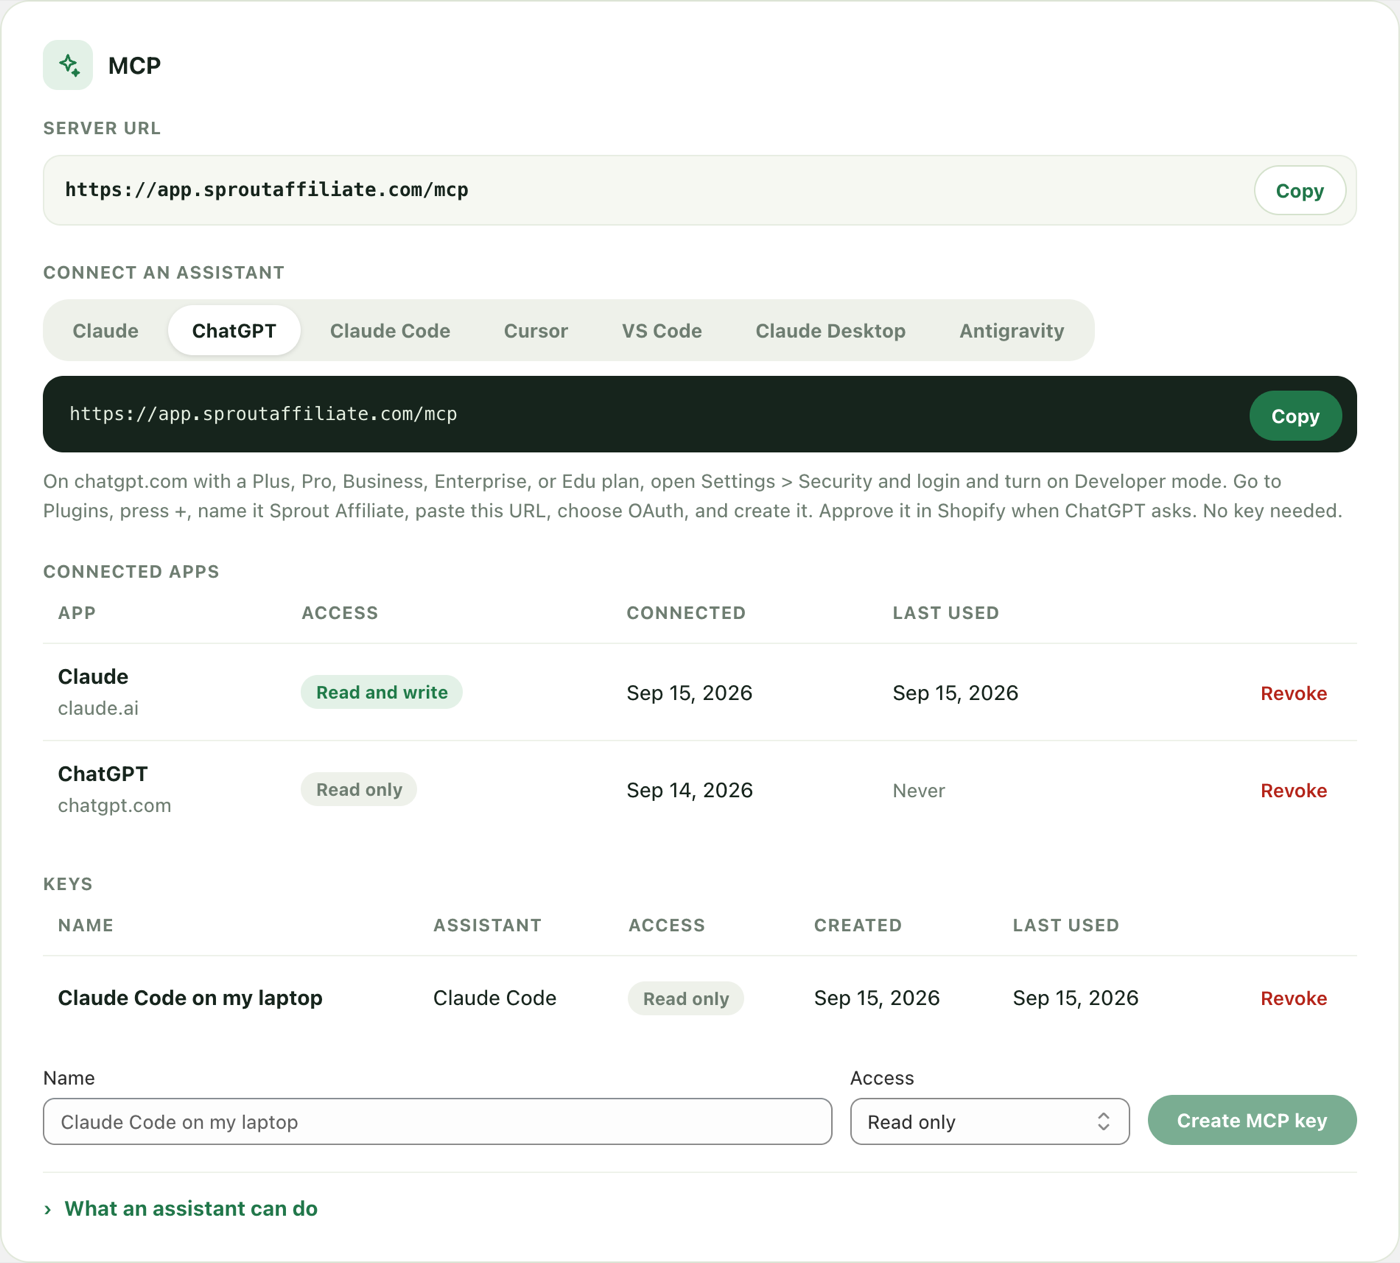
- In ChatGPT, open Settings > Security and login and turn on Developer mode.
- Go to Plugins and press +. Name it Sprout Affiliate, paste the URL, choose OAuth, and create it.
- ChatGPT opens the same Sprout Affiliate page as above. Press Continue in Shopify, choose the access, press Approve, then Continue to ChatGPT.
ChatGPT asks you to confirm each change before it makes one; the read tools are marked read only, so looking things up needs no confirmation.
How the Connect button works
- No password. Sprout Affiliate knows it is you because your Shopify admin is signed in. The store you are signed in to is the one that connects, and the approval page names it.
- Only the assistant you started. The approval is tied to the window that started connecting, so a connection link someone sends you cannot connect their assistant to your store.
- For the MCP server only. What the assistant receives works on
/mcpand nowhere else. It is refused by the merchant API, and it can never run a payout. - Until you end it. The connection renews itself and stays until you revoke it in Settings > Developer > Connected apps.
Other assistants: get a key
- In Shopify, open Sprout Affiliate > Settings > Developer.
- In the MCP card, give the key a name you will recognise, such as Claude Code on my laptop.
- Choose Read only to let the assistant look things up, or Read and write to also let it approve applications and orders, change an affiliate, and add a bonus.
- Press Create MCP key, then pick your assistant under Connect an assistant. The setup shown has your new key filled in. Copy it now: the key is shown once.
The key belongs to one store. Send it in the Authorization header, with or without Bearer in front.
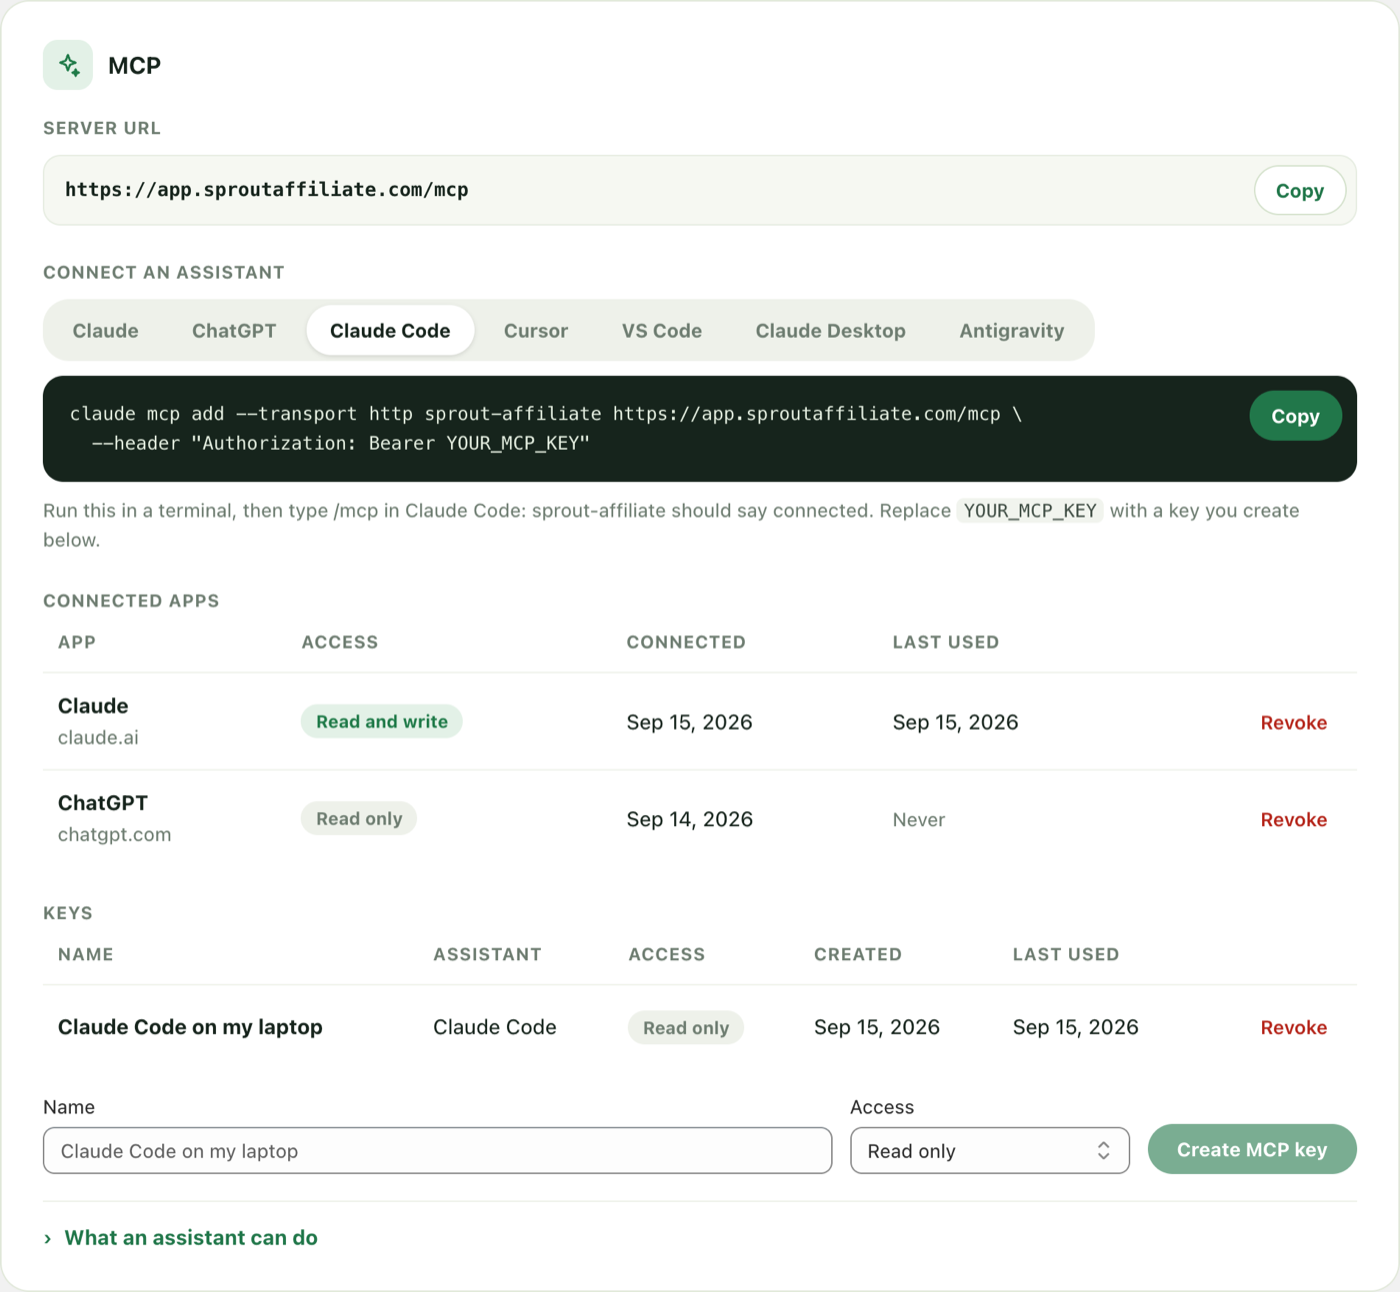
Claude Code
Run this in a terminal:
claude mcp add --transport http sprout-affiliate https://app.sproutaffiliate.com/mcp \
  --header "Authorization: Bearer YOUR_MCP_KEY"
Then type /mcp in Claude Code. sprout-affiliate should say connected.
Cursor
Add this to ~/.cursor/mcp.json, or to .cursor/mcp.json in a project, then turn sprout-affiliate on in Cursor Settings > MCP.
{
  "mcpServers": {
    "sprout-affiliate": {
      "url": "https://app.sproutaffiliate.com/mcp",
      "headers": { "Authorization": "Bearer YOUR_MCP_KEY" }
    }
  }
}
VS Code
Add this to .vscode/mcp.json in your workspace and press Start above the entry. The tools appear in Copilot Chat in Agent mode.
{
  "servers": {
    "sprout-affiliate": {
      "type": "http",
      "url": "https://app.sproutaffiliate.com/mcp",
      "headers": { "Authorization": "Bearer YOUR_MCP_KEY" }
    }
  }
}
Claude Desktop
Open Settings > Developer > Edit Config, add this to claude_desktop_config.json, and restart Claude. It needs Node.js installed.
{
  "mcpServers": {
    "sprout-affiliate": {
      "command": "npx",
      "args": ["-y", "mcp-remote", "https://app.sproutaffiliate.com/mcp",
               "--header", "Authorization:${SPROUT_AFFILIATE_KEY}"],
      "env": { "SPROUT_AFFILIATE_KEY": "Bearer YOUR_MCP_KEY" }
    }
  }
}
Antigravity
Open Settings > Customization > Installed MCP Servers > Open MCP Config, add this, save, and restart.
{
  "mcpServers": {
    "sprout-affiliate": {
      "serverUrl": "https://app.sproutaffiliate.com/mcp",
      "headers": { "Authorization": "Bearer YOUR_MCP_KEY" }
    }
  }
}
What an assistant can do
| Tool | Key | What it does |
|---|---|---|
get_store | read | The store, its plan, currency, timezone, and what the key may do |
list_affiliates | read | Affiliates and applications, by status or program |
get_affiliate | read | One affiliate, and what they are owed |
count_affiliates | read | How many affiliates, in total and by status |
list_programs | read | Programs, their commission, and their discount |
list_referral_orders | read | Referral orders by status and date |
get_commission_summary | read | Commission and sales split by pending, approved, paid, and rejected |
get_performance | read | The Analytics page for a time frame: totals, the previous period, top affiliates, programs, and products |
get_top_affiliates | read | Best or worst affiliates by referred sales |
list_payouts | read | Paid payouts and who was in each |
list_bonuses | read | Unpaid bonuses |
approve_affiliate_application | write | Approve a pending application |
decline_affiliate_application | write | Decline a pending application |
approve_referral_order | write | Approve a pending referral order |
reject_referral_order | write | Reject a pending referral order |
update_affiliate | write | Change an affiliate's rate, status, or note |
add_bonus | write | Grant an affiliate a bonus |
A read only key is shown the read tools only. Every tool answers exactly what the matching API endpoint answers, with the same numbers, so what the assistant tells you matches the admin. The assistant is told to say what a write tool will change and wait for you to agree before running it.
How good the answers read depends on the assistant and the model behind it. The server hands it accurate figures; summarising them is the model's job.
What it cannot do
- Run a payout. Payouts are run in the Sprout Affiliate admin. No tool sends or records one.
- Reach another store. A key reaches the store it was created in, and nothing else.
- Change an affiliate's payout details. Only the affiliate can, in their portal.
Managing connections
Connected apps in the MCP card lists every Claude and ChatGPT connection, with its access, when it connected, and when it was last used. Revoke disconnects it at once; connect again from the assistant to get it back.
The Keys list below it shows each key, the assistant it last connected from, what it may do, and when it was last used. Revoke disconnects that assistant at once. To swap a key, create a new one, update the assistant, then revoke the old one.
Troubleshooting
- Unauthorized, or the server will not connect. With a key: the key is missing, mistyped, or revoked. Create a new one and paste the setup again. With Claude or ChatGPT: remove the connector and add it again.
- "This connection request has expired". The approval took longer than 30 minutes. Press Connect in the assistant again.
- The wrong store connected. Revoke it in that store's Settings > Developer, switch stores in Shopify, and connect again.
- Every tool says the API is on the Professional plan. The store is below Professional. The key keeps working as soon as the plan does.
- A tool says the key is read only. Create a Read and write key for that assistant.
- Too many requests. A key makes up to 120 calls a minute. A tool that counts or totals may make several.